Automatic Transcription Service
Overview
The zedif provides an IT service that allows you to transcribe audio recordings automatically, in a privacy-friendly manner and free of charge, while maintaining high quality. We use open-source software that processes your recordings exclusively within the university network on university-owned computers, and deletes them after the transcription. The service can identify different speakers and supports multiple languages — including Spanish, Italian, English, Portuguese, and German — making it useful in a wide range of research contexts.
You will receive the completed transcripts as a Word document that includes practical macros, which allow you to play the original recording and easily correct the text. In addition to the transcription, the text segments are also assigned to individual speakers and appropriately marked in the transcript.
You can conveniently use the service through your computer’s file manager by placing the files to be transcribed in a pre-configured location within the university’s central storage system (documentationExternal link, German). The service downloads the media files to be transcribed from there and places the finished transcripts back at the same location.
Feedback welcome!
The service is currently in beta phase, and we aim to further improve it together with our users. Please reach out ot us via Email with any questions, requests, or suggestions.
To use the transcription service, you must be connected to the university network or have an active VPN connection (documentationExternal link, German). Otherwise, you will not be able to reach the university storage.
Using the service
You use the service through your file manager — for example, Windows Explorer on Windows, or the Finder on macOS. This allows you to connect to the university’s central storage system. There, you create a directory specifically dedicated to the transcription of your recordings. Instructions on how to do this can be found below in the “Registration” section.
Besdes you personal drive, you have access to up to two further drives in the central storage system:
- the group drive of your workgroup, and
- a project drive for your research project (if set up).
You may use either one of these two for the transcription service. The personal drive, however, is reserved exclusively for you and the service cannot access it.
Registration
To use the transcription service, follow these steps:
- Connect to the central university storage as described in the documentationExternal link (German).
- Windows: Open the Windows Explorer, click on the address bar, and enter the URL to your storage drive, e.g.:
//storage.uni-jena.de/home/u/userid/ - macOS: Open Finder, in the menue click Go > Connect to Server… and type „smb:“ plus the URL to your storage drive, e.g.:
smb://storage.uni-jena.de/home/u/userid/ - Log in with your university credentials. As login name use the alphanumeric university ID followed by “@uni-jena.de”, e.g.
userid@uni-jena.de
- Windows: Open the Windows Explorer, click on the address bar, and enter the URL to your storage drive, e.g.:
- There, create a new directory for data exchange with the service. Name it, for example, “transcription”.
- Register by sending us an email with the URL of the directory you created on the universty storage, e.g.
//storage.uni-jena.de/home/u/userid/Transkription:
→ register via email
Workflow
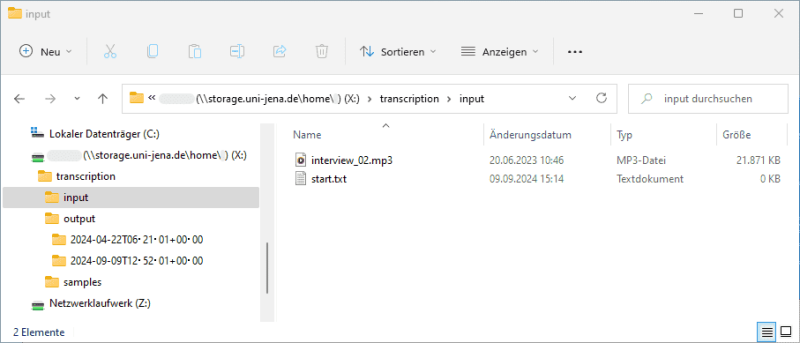
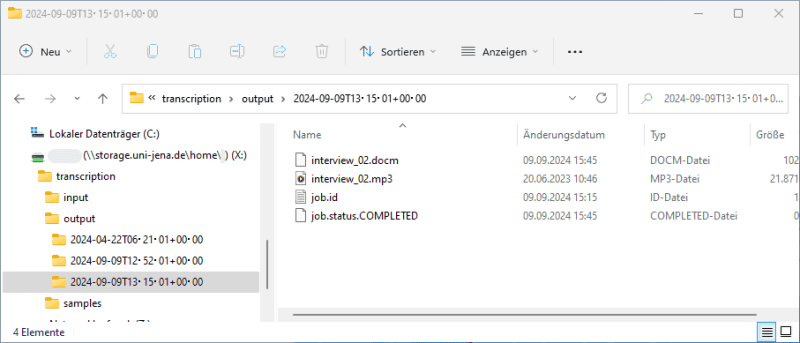
The service will create two subdirectories in your transcription directory: “input” and “output.” The first one, “input”, is where you place the media files to be transcribed. Once the transcription is complete, you will find the transcripts in the “output” directory. The original media files wil also get moved there.
Here is how the workflow looks:
- Copy the audio files to be transcribed into the “input” directory. The total play time should not exceed six hours.
- In the “input” directory, create a file with the name “start.txt”. This signals the service that all files to be transcribed have been places there and transcription can start.
- Windows: right-click within the directory “input”, choose New > Text file, and name the file “start.txt”.
- macOS: Open a text editor or word processor (e.g. TextEdit, Word, etc.), create an empty document and save it under “input/start.txt”.
Windows Explorer showing the input folder of the exchange directory on the network storage
Graphic: Eckhard KadaschAs soon as the transcription has finished, you will find transcripts for every audio file in the form of a Word document (.docm) of the same name, and in addition, the status file “job.status.COMPLETED”. At the same time the transcripts and the associated audio files will be deleted from the university cluster.
How does the service work?
For the transcription, we use a version of the open-source software noScribeExternal link, modified for use on our cluster Draco, which in turn is based on the open speech recognition model WhisperExternal link by OpenAI.
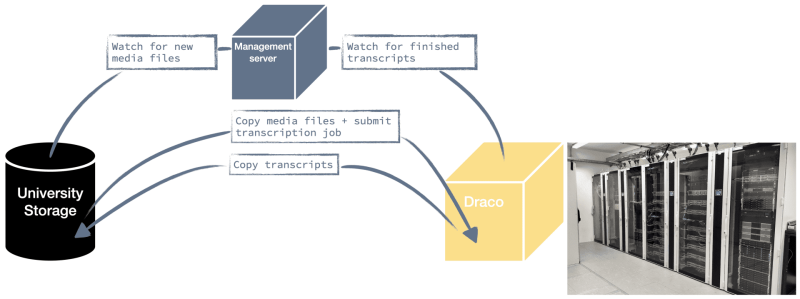
The service is realized through a management server that connects the central university storage and the job scheduling system of the university cluster Draco.
Systems involved: The management server coordinates the processing, the university storage serves as the user interface and the Draco computing cluster handles the actual transcription.
Graphic: Eckhard KadaschThe server watches the data directories of registered users. As soon as new media files along with the file “start.txt” are found there, the media files will get picked up automatically and transferred to Draco for transcription. At the same time, the management server looks out for finished transcripts on the cluster, which will be put back to the users’ transcription directory on the university storage.


